Archive for Solutions

Kdiff3 as Git mergetool and –auto pitfall

In Git, when merging you can sometimes observe the behavior when a conflict has been somehow auto-magically solved without any user interaction at all and without displaying resolution tool window. I have experienced this with commonly used Kdiff3 tool set up as the default mergetool. It turns out that Git has hardcoded --auto option when invoking Kdiff3. This option instructs Kdiff3 to perform merge automatically and silently and display the window only if it is not able to figure out conflict resolutions itself. My understanding is, that it is intended solely for trivial cases and most of the time the window is displayed anyway. However, I am writing this post obviously because such “feature” once has got me into trouble — the tool fixed conflict, but should not have and, of course, did it wrong. In my opinion it is undoubtedly better to always make the decision on your own, instead of relying on some not well known logic of the tool.

The solution is to define custom tool in .gitconfig with Kdiff3 executable and custom command line parameters. Here is the configuration which I use on Windows:

[merge]
    tool = kdiff3NoAuto
    conflictstyle = diff3

[mergetool "kdiff3NoAuto"]
    cmd = C:/Program\\ Files\\ \\(x86\\)/KDiff3/kdiff3.exe --L1 \"$MERGED (Base)\" --L2 \"$MERGED (Local)\" --L3 \"$MERGED (Remote)\" -o \"$MERGED\" \"$BASE\" \"$LOCAL\" \"$REMOTE\"

One thing cmd.exe is better at than *nix shells (with default configuration)

I know the statement might be considered controversial. I even encourage you to try to prove me wrong, because I wish I knew better solution.

In my every day work I tend to use command prompt a lot. I have both cmd.exe and bash (from Git for Windows) opened all the time. My typical environment comprises numerous directories, I mean more than one hundred. Many of them share parts of their names. The names are long, dozens of characters. I have to move between them over and over again. The problem is that it is not feasible to type longish directory name many times manually.

Now, let’s suppose we have the following (shortened, of course) subdirectories structure of a directory which we are in at the moment:

..
aa
bbaa
ccaadd
eeaaff

When I would like to change the directory to bbaa in cmd.exe I type cd *aa* <Tab> <Tab>, I get the second result of auto completion, I press <Enter> and I have moved to bbaa. If I press <tab> three times, I get ccaadd. And when I press <tab> four times, I get eeaaff. This feature is brilliant. The auto completion works with wildcards and matches not only beginnings of a name. Last, but not least, it allows to cycle through suggestions while in-line editing a command.

The most important part here is: not only beginning of a name (which is, as far as I know, the behavior of a typical Unix shell) AND also ability to have the suggestions inserted in place, not only displayed them below the command prompt.

A Unix shell also does match wildcards, but only displays matched names. It does not offer (or I am not aware of it) a way to instantaneously pass matched name to a command. It only lists relevant suggestions and a user have to then manually re-edit the command so that it has desired argument. cmd.exe is better in that it allows a user to cycle through suggestions while in-line editing command argument. Which is great when it comes to long names of which only some parts can be conveniently memorized by a human.

I propose the following function which could be appended to .bashrc.

function cdg() { ls -d */ | grep -i "$1" | awk "{printf(\"%d : %s\n\", NR, \$0)}"; read choice; if [ "$choice" == "0" ]; then : ; else cd "`ls -d */ | grep -i \"$1\" | awk \"NR==$choice\"`"; fi; }

It is a simplistic function that searches through ls results with grep, parses them with awk and finally picks one of them and calls cd.

Now we can type cdg aa and we get all possible choices:

1 : aa/
2 : bbaa/
3 : ccaadd/
4 : eeaaff/

We simply type the number and we are done being moved to the desired directory. Without the need to manually re-enter the cd command with proper argument. Obviously, in cmd.exe we get this nice auto completion for every command typed in the interpreter, and my solution only solves changing directory use case in bash.

2014.02.02 UPDATE 1: After some deeper research, it turned out that the behavior of cmd.exe can be achieved in bash as well. The following line should be included into .bashrc:

bind '"\t":menu-complete'

However, my solution still serves the purpose as it uses grep -i which makes it case insensitive and thus renders it useful.

2014.02.06 UPDATE 2: I have experienced the second reason my solution is still relevant. It is much faster than pressing <tab> and waiting for the shell to suggest names. This can be observed in an environment with number of directories greater than a few, where MinGW tooling tends to be slow in general.

The limit of 260 characters path length and mysterious error message

If you work on small and relatively simple projects (in terms of number of components) you may not encounter this limitation. But in any non trivial ‘line of business’ application it is very likely that sooner or later you will come across this troublesome problem: Visual Studio refuses to open a project when the length of its (or any of its references) file system path is longer than 260 characters. The issue is more serious as it seems to be because of its manifestation in somewhat cryptic error message (I suppose different error messages caused by this problem may be spotted in the wild as well).

error

The error message gives absolutely no clue what the real problem is. After some research I was aware of the existence of this limitation, but I could not believe the path issue can end up with such error message. Eventually, I decided to conduct in-depth investigation with some advanced debugging tools to confirm the root cause of the problem. I followed the great advice from Case of the Unexplained series by Mark Russinovich: when in doubt, run Process Monitor. The picture below shows file system activity of devenv.exe process when it is opening solution containing suspicious projects.

pm

  • We can see the querying directory event and part of its results.
  • The results comprise file names in alphabetical order. These files should be opened by Visual Studio and thus the appropriate project references should be loaded. All of these files are expected to take part in consecutive file system events.
  • File names in green frames are both in the result list of querying directory and are then opened by the devenv.exe process. As expected.
  • File names in red frames are in the result list of querying directory, but are missing from file system activity events further (second window in the background). And this causes the problem.
  • All files that are missing have path length longer than 260 characters.
  • All files that are correctly opened by devenv.exe and loaded into the project and whose file system events are visible in Process Monitor have path length shorter than 260 characters. Obviously, the example shows only some of them, but I analyzed them all to draw the conclusion:

This proves that project references that point to dependencies with path length longer than 260 characters were not loaded and thus prevented the whole project from being loaded properly. After moving the solution to the root directory of the drive (the single letter, e.g. C, is indeed the shortest directory name possible) the problem was solved.

To wrap up:

  1. Be aware that 260 characters limit for path does exist in Windows operating system.
  2. The observable symptoms of hitting this limitation probably will not help you solve the problem.
  3. The solution in most cases could be to rename one or more directories or to make a symbolic link in the root directory of the drive.
  4. The problem described above occured under Windows 7 SP1 64-bit and Visual Studio 2012 Professional.
  5. Do not hesitate to use Process Monitor. It is incredibly powerful tool when it comes to solving wide range of operating system problems.

What do I use Raspberry Pi for?

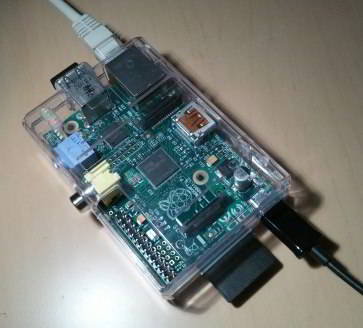
Raspberry Pi

I have to admit I am really impressed by the ideas of Pi use cases that people come up with all around the world (e.g. this list). Raspberry Pi is a microcomputer that almost every engineer passionate about computer science and/or electronics could hardly resist playing around with. Yet, I do not have plenty of creative ideas what to do with it. But, as it turns out, it can perform extremely well doing even simple tasks.

I began my set up with downloading and flashing Raspbian Linux distro into rather high class SD card. It is important to pay attention to card’s class because difference between 3-4 MB/sec and 10 MB/sec transfer speed does matter. It is pretty easy to flash Raspbian and to do the initial set up. You do not have to install it, because you are flashing ready to run image of working system. Then I installed additional packages with services:

  • VNC server allows me to detach monitor, keyboard and mouse from the device and to connect to its desktop remotely. This tutorial was the starting point for me.
  • SSH server is also a must-have. I can can easily login to the shell with Putty or from Android device using JuiceSSH.
  • Last but not least, I started Samba server, which is the main “server role” for my Raspberry Pi.
  • I also started nginx web server to be able to access shared folder with a web browser.

I use my Raspberry Pi as a file exchange server between all my devices including laptops and Android devices. As for me, it is extremely useful. I do not have to power on my laptop to send a file to or from the tablet. Now I have the computer that is always on and just serves my files. On Windows I have mapped network drive to the Samba share and on Android device I use X-Plore file manager which has an option to connect to SMB share. One important thing is to set an anonymous Samba share so that Android clients do not have to enter Windows credentials. Just in case, here are the smb.conf contents that work great for me:

workgroup = HOME
security = share
guest account = pi 
[LAN_EXCHANGE]
comment = LAN EXCHANGE
path = /home/pi/LAN_EXCHANGE
browseable = yes
read only = no
guest ok = yes
create mask = 0666
directory mask = 0777

And please do not tell me there already exist inventions like this WiFi “Drives”. I am pretty sure they not only are more expensive, but also have nothing to do with aforementioned protocols which IT pros use 😉

VirtualBox USB Filters

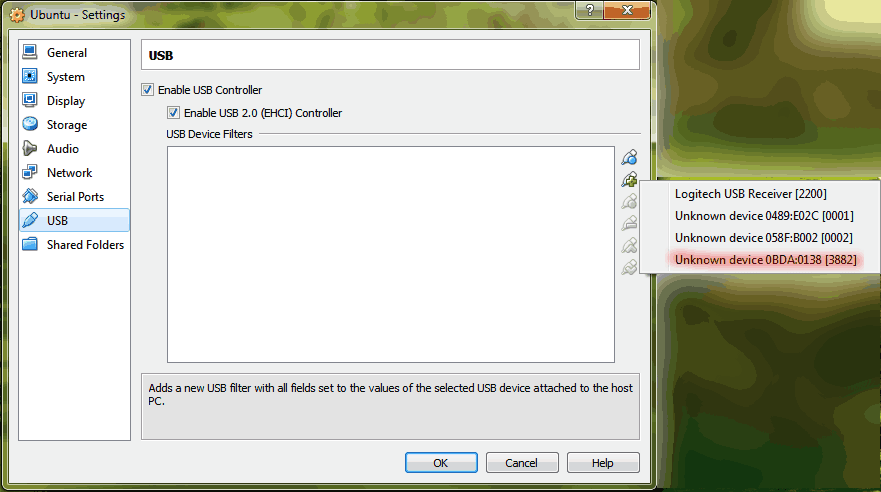
Although primarily I work on Windows operating system, as a person having some Unix background I feel comfortable having a linux distro close at hand. I use Oracle VirtualBox for virtualization. One of the tasks that I find pretty hard to do with this hypervisor is creating USB device filter (allowing guest os to use host’s devices). More often than not, the application fails at recognizing USB device name, and serves raw protocol codes as labels.

VirtualBox USB settings

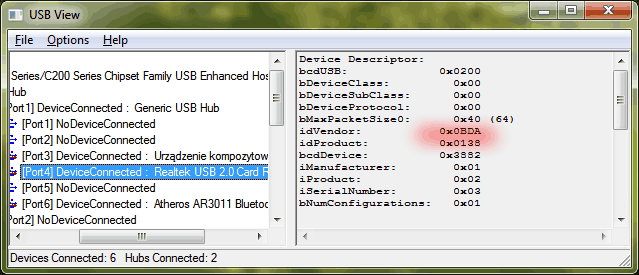
The problem here is that it is really difficult to guess the actual device. In such situations I would like to recommend rather obsucre Microsoft tool called USB View. It is not very easy to find a download, because the original version of the tool was created back in Windows 9x days, however it still works, has updated versions and could be particularly useful. Just look at the screen showing all connected USB devices:

VirtualBox USB settings

Now I can quickly decode the device numbers and connect the right one, which is card reader, to the virtual machine. BTW, it also good to know the internal architecture of modern laptops — their equipment are most likely connected to the mother board via USB.

UPDATE: USB View is part of Windows SDK, it is installed along with debuggers. Link to Windows SDK for Windows 8.1

Start your own service detecting if an e-mail was read

I have come up with the idea after trying out bananatag.com which is such tracking service. Their solution is simple: let’s attach small, one-pixel image to an e-mail and log when it was downloaded. Providing that getting an image happened exactly when a user opens an e-mail.

What concerns me is the way the idea is implemented. They provide dedicated browser extension working with GMail or MS Outlook extension. So far so good, but if you use neither of these you have to “sync” your Banatag account with your e-mail account. It boils down to simply giving your log-in and password information to Bananatag. Then they act as a proxy for sending e-mails and they attach appropriate images on the fly.

Both solutions sound not so good to me. I prefer not to install many extenstions to keep my software installations as lightweight as possible. I typically work on more than one machine and installing extensions is not always possible. Last but not least, giving my credentials to some company is unacceptable from security point of view.

However, the idea is so simple that it is possible almost for everyone to start up completely own tracking web application. In this post I provide complete instructions as well as small, self-contained source code written in pure ASP.NET without any external dependencies.

First, you need free web hosting provider supporting ASP.NET. I have come across somee.com which seems to be fairly good. They offer 150MB space and require you to access web page at last once a month. After signing up and creating new web site you end up with address like http://(yourname).somee.com. Then you can download source code from my Skydrive which is pr.ashx. It stands for pixel recorder, because it is an application which serves one pixel image and records each event in randomly named text file. Simply upload that file into the root of your newly created somee.com account. Now you can access it from the Internet typing http://(yourname).somee.com/pr.ashx.

When the application starts for the first time it creates uniquely named text file and provides a link to it. Now you can start using it. When you are writing an e-mail insert an image from a URL to have it tracked. Please make sure that you force your e-mail composing app not to attach image to the message body, but rather to preserve the reference to your web application serving the image. The URL is as simple as this: http://(yourname).somee.com/pr.ashx?token=1. Where token is a number between 1 and 100. You can further adjust the range in source code. Now every time someone attempts to access this URL, one-pixel image is served and the time stamp is written into unique text file. You can use it from anywhere in any e-mail composing app, web mail or desktop. You can view your log and check from anywhere using any web browser whether an e-mail have already been read. Just remember what token number was associated with particular message and keep in mind some e-mail providers do not download any images by default (e.g. GMail — user has to click button to download any images included in the message body). Have fun!