Little semantic pitfall of try..finally

This time I would like to point out the behaviour, that should be absolutely clear to any C# developer. When an exception is thrown inside try..finally block (without catch), and consequently in the scope of a using statement, it is bubbled up to the containing scope, rather than handled in any way. It implies that try..finally without catch has in fact nothing to do with exception handling.

I have already come across learning materials that suggest the otherwise. Let’s have a look at [1] (my own translation from Polish):

With a using clause we end up having code which is proof against exceptions

and [2]:

A finally block can be used to handle any exception

In my opinion the fact, that in the very case of try..finally apart from catch an exception is simply thrown out of the scope, is not stressed enough in the literature and claims like these above can be misleading.

Going a little bit further, I consider this as a little semantic pitfall in the language. When we think of a try statement, we immediately recall exception handling mechanism. However this time this is not the case. Maybe other languages have better (i.e. more meaningful) way of expressing the intent of a code being executed at the end of a scope. Have a look at scope(exit) and scope(failure) instructions in D language in [3].

[1]. Polish magazine “Programista”, issue 6/2013 (13) p. 26

[2]. “Programming in C#, A primer, second edition”, chapter 18.8
[3]. Three Unlikely Successful Features of D

Less known feature of C# 5.0 — modified closure behaviour

If you were asked to mention new features of C# 5.0, then you would probably say, first of all, async / await. However, on MSDN there is list of changes that could hardly be considered as well-known, even after almost 1 year after .NET 4.5 RTM was published. In this post I briefly explain one of them, that in my opinion is worth remembering.

As a C# developer, you are hopefully aware of the outer variable trap issue. Yet, in the version 5.0 of the language, the behaviour of a closure has been slightly altered. Let’s take a look at first (regarding comment “switches”) half of the following code:

Now let’s try to compile it using version 3.5 and 4.5 of the compiler. This assumes default installations, the file is named Program.cs and, of course, as 4.5 version of run-time is in-place update, it resides in the directory named after 4.0.

  1. c:\Windows\Microsoft.NET\Framework\v3.5\csc.exe Program.cs && Program
  2. c:\Windows\Microsoft.NET\Framework\v4.0.30319\csc.exe Program.cs && Program

The former example results in 1 1 printed into the console and the latter results in 0 1 printed. The 1 1 result is caused by typical outer variable trap, where the lambdas are kind of bound to the captured variable itself (which in the end has a value of 1), but not to its value at the time of creation of the lambda. The breaking change introduced in version 5.0 of the language brings the behaviour to what actually might have been expected — capture the value indicated by the sequence of the code being executed. However, this works only inside foreach loop.

By switching the comments (deleting the first slash) you can prove standard for loop behaves exactly the same in both versions of compiler and results in printing 2 2 indicating outer variable trap.

Interface type parameter covariance and contravariance in C#

  • I would like this blog post to serve as a quick reference that recalls the basic concept of covariant and contravariant type parameters of generic interfaces in the C# language.
  • I tried to keep the example as simple as possible. Included comments explain the key points. No long stories and no dissertations.
  • The code does nothing, but compiles on C# 4.0 or newer compiler.
  • Try deleting the first slash character in the first line to kind of switch between the snippets (BTW this is cool trick 🙂 ).

What do I use Raspberry Pi for?

Raspberry Pi

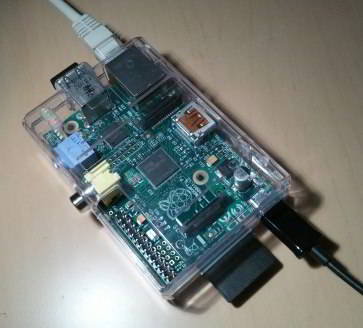
I have to admit I am really impressed by the ideas of Pi use cases that people come up with all around the world (e.g. this list). Raspberry Pi is a microcomputer that almost every engineer passionate about computer science and/or electronics could hardly resist playing around with. Yet, I do not have plenty of creative ideas what to do with it. But, as it turns out, it can perform extremely well doing even simple tasks.

I began my set up with downloading and flashing Raspbian Linux distro into rather high class SD card. It is important to pay attention to card’s class because difference between 3-4 MB/sec and 10 MB/sec transfer speed does matter. It is pretty easy to flash Raspbian and to do the initial set up. You do not have to install it, because you are flashing ready to run image of working system. Then I installed additional packages with services:

  • VNC server allows me to detach monitor, keyboard and mouse from the device and to connect to its desktop remotely. This tutorial was the starting point for me.
  • SSH server is also a must-have. I can can easily login to the shell with Putty or from Android device using JuiceSSH.
  • Last but not least, I started Samba server, which is the main “server role” for my Raspberry Pi.
  • I also started nginx web server to be able to access shared folder with a web browser.

I use my Raspberry Pi as a file exchange server between all my devices including laptops and Android devices. As for me, it is extremely useful. I do not have to power on my laptop to send a file to or from the tablet. Now I have the computer that is always on and just serves my files. On Windows I have mapped network drive to the Samba share and on Android device I use X-Plore file manager which has an option to connect to SMB share. One important thing is to set an anonymous Samba share so that Android clients do not have to enter Windows credentials. Just in case, here are the smb.conf contents that work great for me:

workgroup = HOME
security = share
guest account = pi 
[LAN_EXCHANGE]
comment = LAN EXCHANGE
path = /home/pi/LAN_EXCHANGE
browseable = yes
read only = no
guest ok = yes
create mask = 0666
directory mask = 0777

And please do not tell me there already exist inventions like this WiFi “Drives”. I am pretty sure they not only are more expensive, but also have nothing to do with aforementioned protocols which IT pros use 😉

Bringing old projects back to life: RGBgen XP

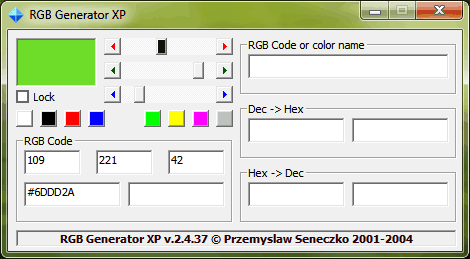
The original application was written back in 2001 in Visual Basic 6. It is quite trivial application (despite the fact, that when I first created it being a kid, for me it was not). It is intended for easily creating hexadecimal RGB codes using sliders. I know, there are plenty of similar tools, also inform of online apps. HoweverI still like the “mechanics” of the UI and its simplicity. It turns out, that I still need it.

However, the originally compiled executable does not work on modern Windows system. I decided to check if it is possible to fix this. I took my Visual Basic 6 installation CD, started snapshotted virtual machine running Windows XP and opened source project files. The application had simple HTML editor and used a few really esoteric OCX controls. In fact, they were not essential for the application’s core functionality. After removing unnecessary references from the project and disabling some of the UI components, I recompiled the source code so that it uses only “out of the box” Visual Basic libraries. The Windows operating system includes Visual Basic 6 runtime DLL even now and finally I managed to run the application on my Windows 7 64-bit machine.

If you want to give it a try, you can download it from my Skydrive

RGBGen XP

VirtualBox USB Filters

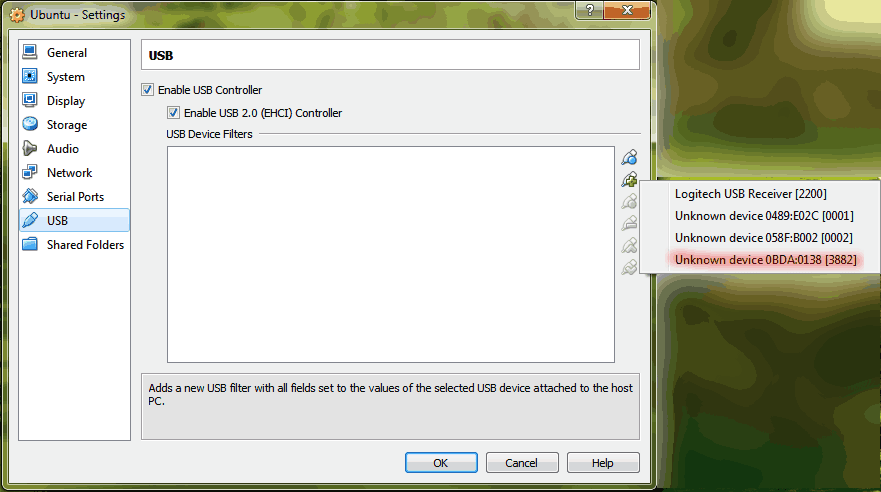
Although primarily I work on Windows operating system, as a person having some Unix background I feel comfortable having a linux distro close at hand. I use Oracle VirtualBox for virtualization. One of the tasks that I find pretty hard to do with this hypervisor is creating USB device filter (allowing guest os to use host’s devices). More often than not, the application fails at recognizing USB device name, and serves raw protocol codes as labels.

VirtualBox USB settings

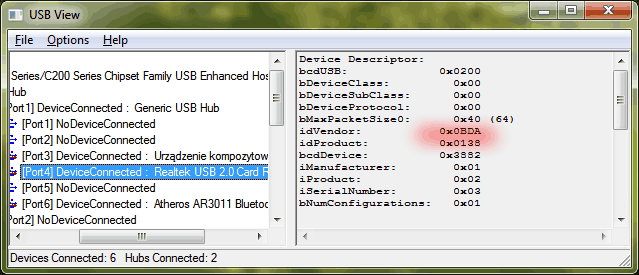
The problem here is that it is really difficult to guess the actual device. In such situations I would like to recommend rather obsucre Microsoft tool called USB View. It is not very easy to find a download, because the original version of the tool was created back in Windows 9x days, however it still works, has updated versions and could be particularly useful. Just look at the screen showing all connected USB devices:

VirtualBox USB settings

Now I can quickly decode the device numbers and connect the right one, which is card reader, to the virtual machine. BTW, it also good to know the internal architecture of modern laptops — their equipment are most likely connected to the mother board via USB.

UPDATE: USB View is part of Windows SDK, it is installed along with debuggers. Link to Windows SDK for Windows 8.1